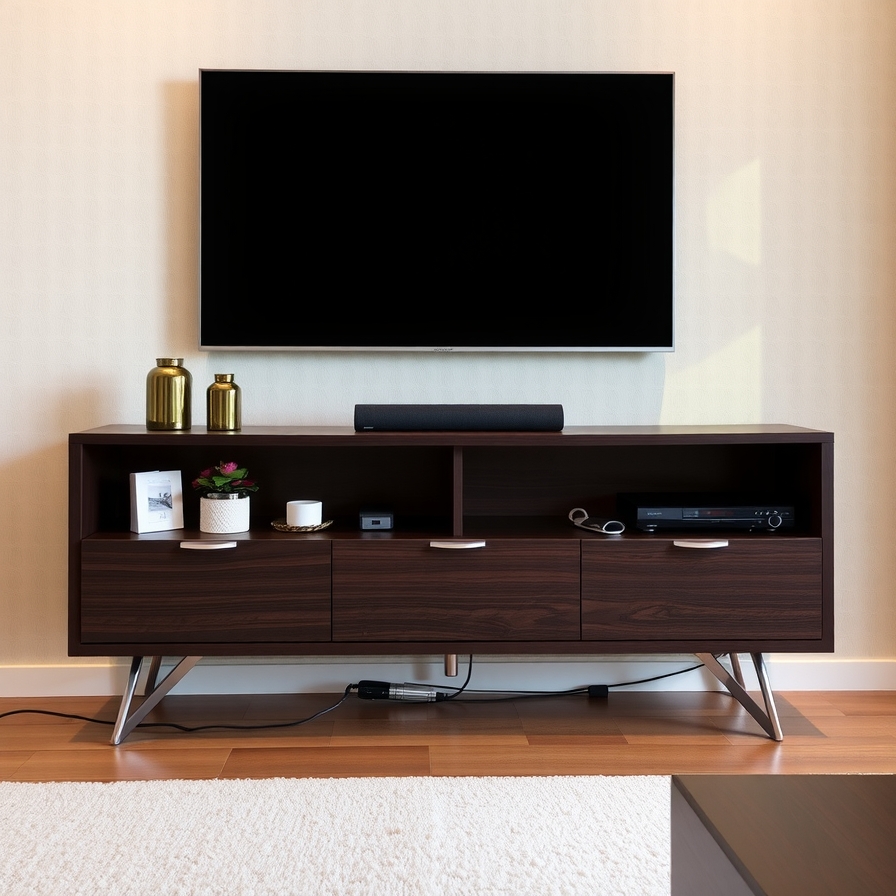
A TV stand often becomes the focal point of a living room, blending practicality with personality. Store-bought options sometimes feel too generic or pricey, which makes DIY projects an exciting way to showcase creativity while saving money. Building your own stand allows full control over design, size, and functionality, ensuring the piece complements both your space and your lifestyle.
From rustic wooden frames to sleek modern builds, homemade TV stands can be tailored to reflect unique tastes. Repurposed materials like old dressers, pallets, or reclaimed wood bring charm and character, while clean-lined builds give a polished contemporary feel. Some designs emphasize storage with shelves and cabinets, while others keep things minimal for a more open look.
Crafting a TV stand at home also brings a sense of accomplishment. The process doesn’t require expert carpentry skills, as many ideas focus on simple construction methods with affordable tools. Even a beginner can create something that feels custom-made. A DIY project can turn a functional piece into a stylish highlight, proving that furniture doesn’t need to be expensive to feel special. Inspiration can spark from simple concepts, and the result often becomes a piece worth admiring every day.
DIY TV Stand Ideas That Elevate Style and Function
A TV is the center of many living rooms. But a TV stand does not need to cost a lot of money. You can build your own. A DIY TV stand saves money. It also adds a personal touch to your space. You can make it fit your room perfectly. You can choose the exact color and style you want.
This guide offers ten do-it-yourself TV stand ideas. Each idea uses different materials. Some projects are very simple. Others need more skill. You will find a project that matches your ability. Let’s get started.
1. The Classic Cinder Block and Wood Plank Stand
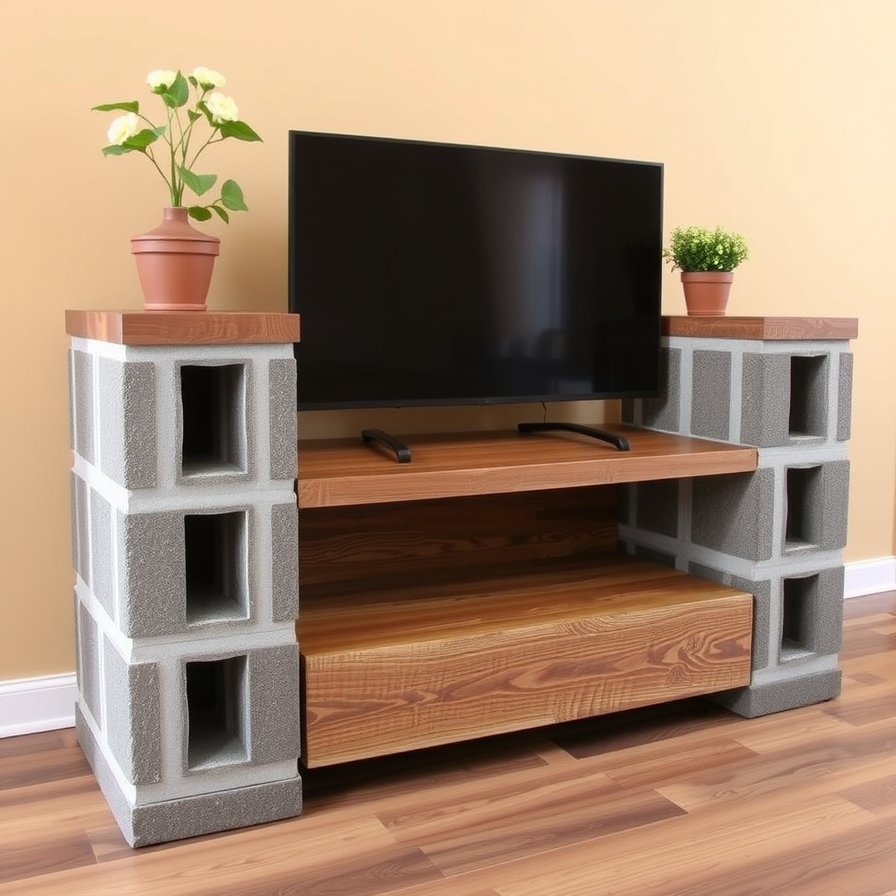
This idea is famous for a reason. It is incredibly easy and affordable. The industrial look suits modern and minimalist rooms. You can build this stand in an afternoon.
Materials You Need:
-
Cinder blocks (4 or 6, depending on length)
-
A wooden plank (sanded or live-edge)
-
Spray paint for the cinder blocks (optional)
Simple Steps:
-
Decide how long you want the stand. For a short stand, use four cinder blocks. Place two on the bottom. Stack two more on top. For a longer stand, use six blocks.
-
Paint the cinder blocks if you want a different color. Use spray paint for a smooth finish. Let the paint dry completely.
-
Place the cinder blocks where you want the stand.
-
Lay the wooden plank on top of the blocks. The plank should rest securely.
-
Your TV stand is ready. You can leave the wood natural. You can also stain or seal it.
This stand is very strong. The cinder blocks hold a lot of weight. You can also add shelves. Just place smaller planks between the blocks.
2. The Simple Hairpin Leg Table
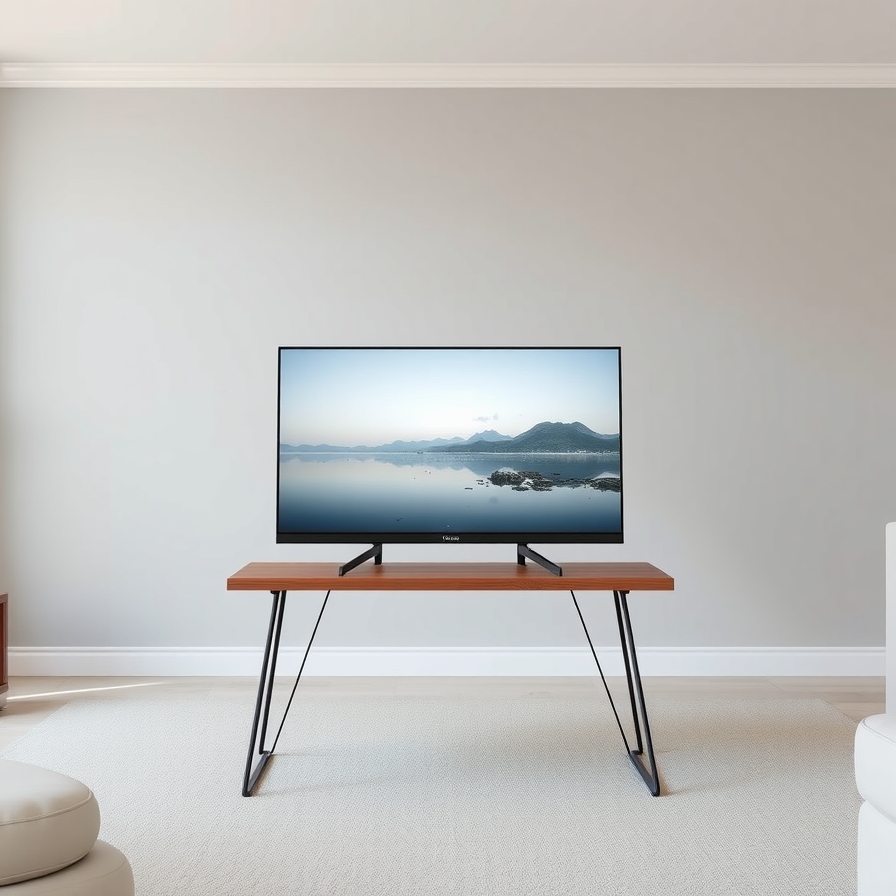
Hairpin legs give a cool, mid-century modern vibe. They are easy to attach to any flat surface. This project creates a sleek, floating table for your TV.
Materials You Need:
-
A tabletop (wood, a door, or a pre-cut piece)
-
Four hairpin legs
-
Screws
-
A drill
-
Sandpaper
-
Stain or paint (optional)
Simple Steps:
-
Choose your tabletop. A piece of plywood works well. An old door is another great option. Make sure the wood is smooth.
-
Sand the tabletop. Remove any rough spots. Wipe away all the dust.
-
Stain or paint the wood. This protects the wood and makes it look nice. Let it dry.
-
Turn the tabletop upside down. Place the four hairpin legs near each corner.
-
Mark where the screws will go. Use a drill to attach the legs firmly.
-
Flip the stand over. It is now ready to use.
This design is very flexible. You can make the tabletop any size. Choose tall legs or short legs. The hairpin legs make the stand look light and airy.
3. The Rustic Wood Crate Stand
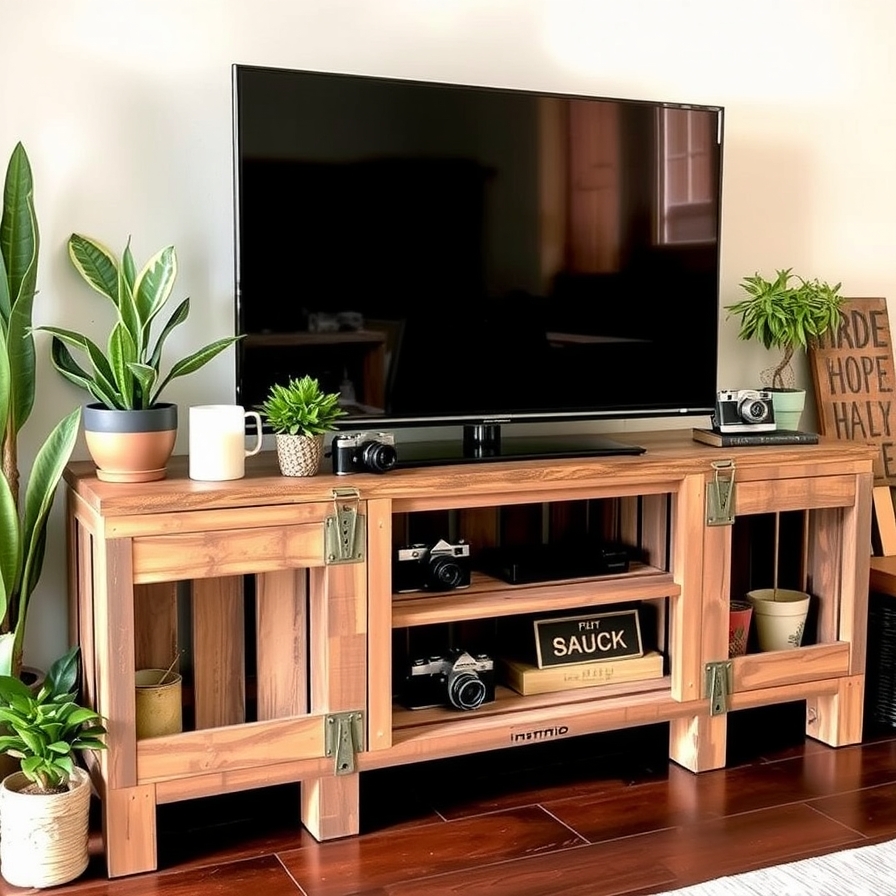
Wooden crates have a charming, rustic feel. You can find them at craft stores or online. This project is like building with blocks. You can arrange the crates in many ways.
Materials You Need:
-
4 to 6 wooden crates
-
Wood glue or screws
-
Sandpaper
-
Paint or stain (optional)
-
Casters/wheels (optional)
Simple Steps:
-
Plan your layout. You can stack two crates high and two wide. Or you can line three crates in a row.
-
Sand the crates. This prevents splinters.
-
Paint or stain the crates if you want a uniform color.
-
Connect the crates. Use strong wood glue. For a stronger hold, screw the crates together from the inside.
-
Add casters to the bottom if you want mobility. This lets you move the TV stand easily.
The best part? You get built-in storage. Each crate is a shelf for books, games, or media boxes.
4. The Repurposed Dresser TV Stand
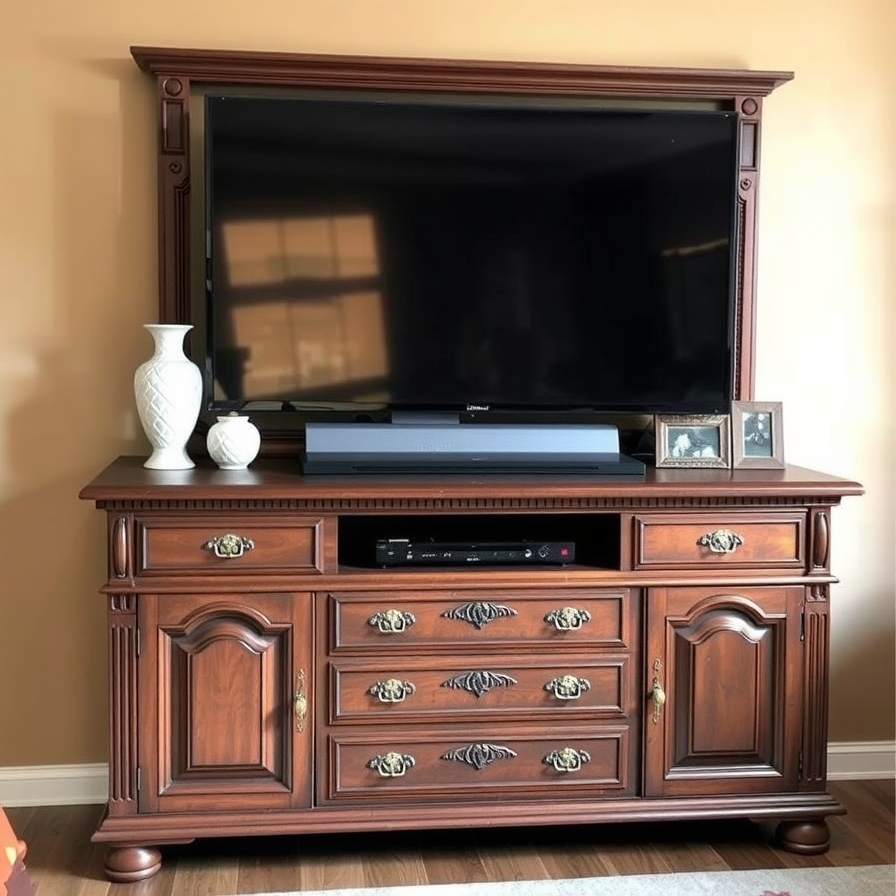
An old dresser can become a beautiful TV stand. This is a great way to upcycle furniture. You give an old piece a new life. It also provides lots of drawer space.
Materials You Need:
-
An old dresser
-
Sandpaper
-
Paint and primer
-
New drawer pulls (optional)
Simple Steps:
-
Find a sturdy dresser. Check thrift stores or your garage.
-
Remove the drawers and hardware.
-
Sand the entire dresser. This helps the new paint stick.
-
Wipe off all the dust.
-
Apply a coat of primer. Primer covers old colors and stains.
-
Paint the dresser with your chosen color. Use two coats for a solid finish.
-
Let the paint dry completely.
-
Attach new drawer pulls if you want a new look.
-
Put the drawers back in.
Your new TV stand has a classic look. The drawers hide all your remotes and cables. It is a very practical solution.
5. The Industrial Pipe and Wood Stand
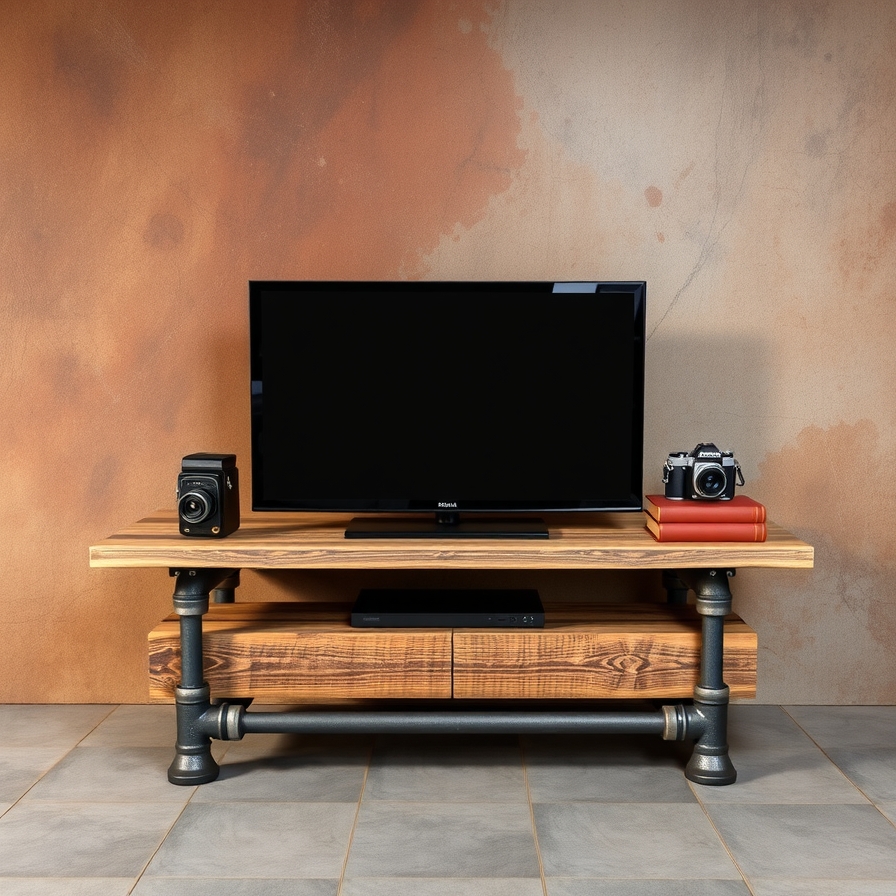
This design is for a bold, industrial style. Metal pipes are strong and adjustable. Combined with wood, they create a unique piece of furniture.
Materials You Need:
-
Black iron pipes and fittings (flanges, elbows, tees)
-
Wood planks for shelves
-
A pipe cutter or a saw
-
A wrench
-
Wood stain
Simple Steps:
-
Design your stand. Decide how many shelves you want. Common designs have two or three tiers.
-
Measure and cut the pipes to the correct lengths. You can often have this done at the hardware store.
-
Assemble the pipe frames for each side. Use the fittings to connect the pipes. Tighten them with a wrench.
-
Cut the wood shelves to size. Sand them until smooth.
-
Stain or seal the wood.
-
Place the wood shelves on the pipe frames. The weight of the wood and TV will hold everything together.
The result is a very sturdy and custom stand. You can adjust the height of each shelf easily.
6. The Floating Wall-Mounted Shelf
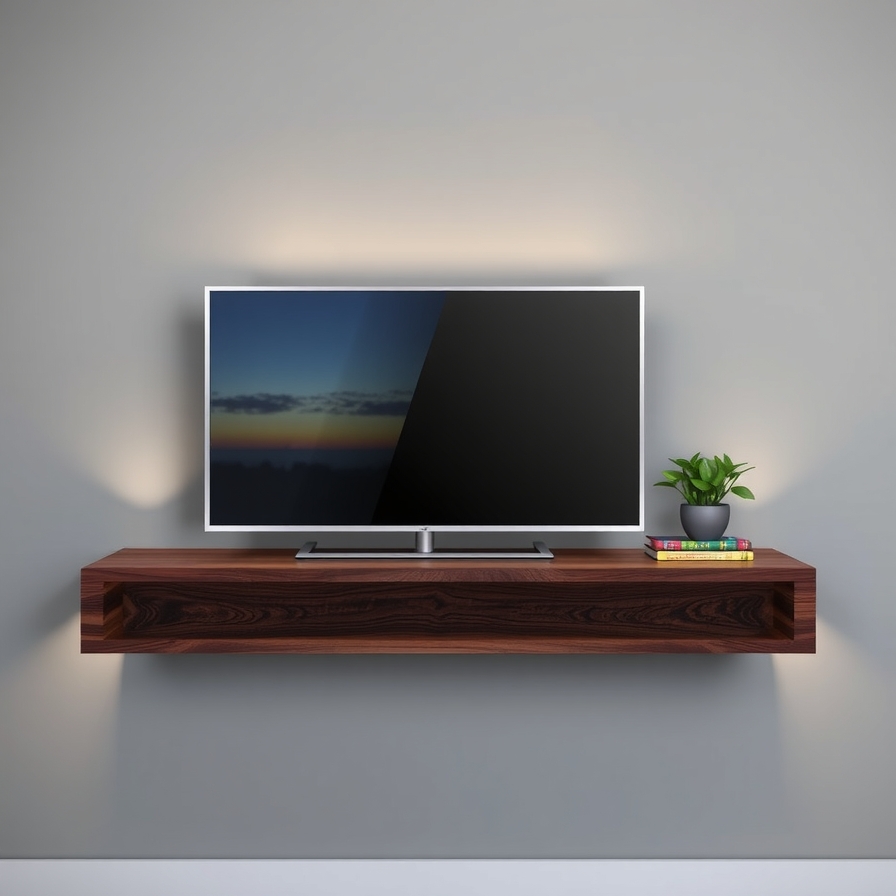
A floating shelf saves floor space. It makes your room look bigger and cleaner. This project requires some wall mounting skills. You need to find the wall studs for safety.
Materials You Need:
-
A thick wooden board
-
Metal shelf brackets (the strong, hidden kind)
-
A stud finder
-
A level
-
A drill
-
Screws
Simple Steps:
-
Choose a solid wood board. It must be thick enough to hold your TV’s weight.
-
Find the studs in your wall using a stud finder. Mark their locations.
-
Hold the shelf brackets against the wall. Align them with the studs. Mark the screw holes.
-
Drill the brackets into the wall studs. This is very important for safety.
-
Slide the wooden board onto the brackets. Secure it with screws from below.
-
Use a level to make sure the shelf is perfectly straight.
Mount your TV on the wall above the shelf. Place your cable box and game consoles on the shelf. The room feels open and modern.
7. The Minimalist IKEA Hack Stand
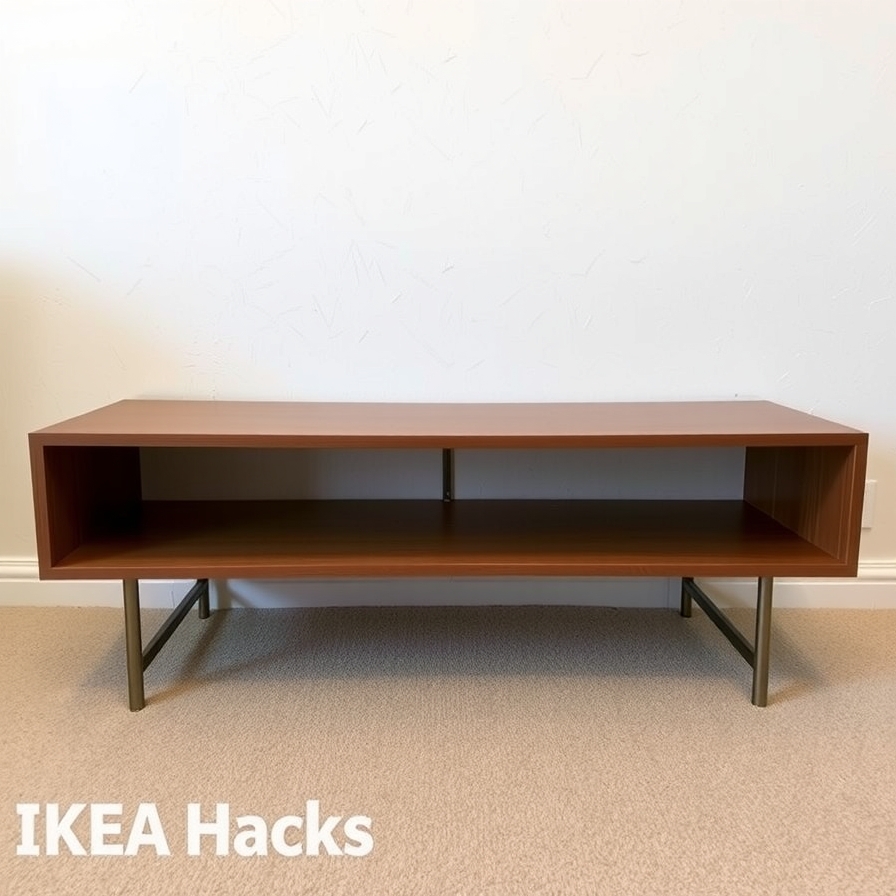
IKEA furniture is perfect for do-it-yourself projects. You can combine simple IKEA items to create a custom TV stand. This is called an “IKEA hack.”
Materials You Need:
-
IKEA cabinets (like BESTÅ units)
-
IKEA legs (like CAPITA legs)
-
A drill
-
Screws
-
Contact paper or paint (optional)
Simple Steps:
-
Buy two or three IKEA cabinet units. The BESTÅ series is a popular choice.
-
Assemble the cabinets following the IKEA instructions.
-
Attach legs to the bottom of each cabinet. The CAPITA legs are tall and modern.
-
Push the cabinets together to form one long stand.
-
For a unified look, add a long piece of wood on top. Or use contact paper to cover the cabinets with a wood pattern.
This method gives you a professional-looking stand. You get plenty of closed storage. The project is very easy because the cabinets are pre-made.
8. The Pallet Wood TV Stand
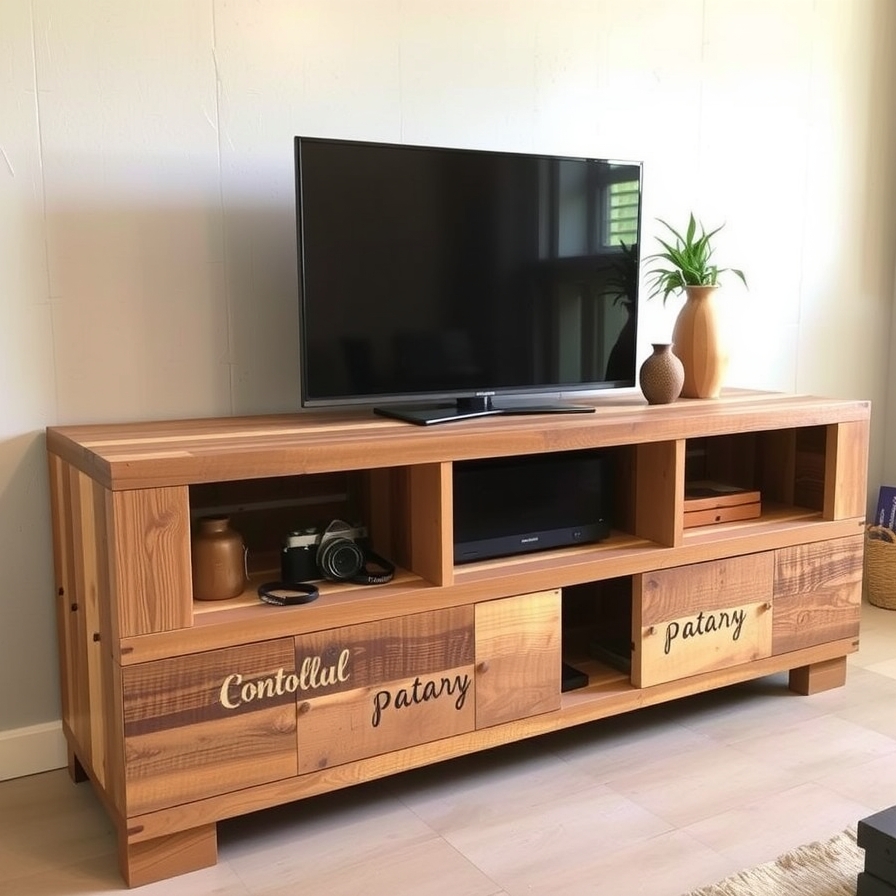
Wooden pallets are often free. You can find them behind stores or online. A pallet wood stand has a rustic, handmade charm.
Materials You Need:
-
2-3 wooden pallets
-
A pry bar
-
A saw
-
Sandpaper
-
Screws
-
Wood stain
-
Casters (optional)
Simple Steps:
-
Take apart the pallets carefully. Use a pry bar to remove the planks.
-
Remove all the nails. Sand the planks to remove rough edges.
-
Design your stand. You can build a simple box frame.
-
Cut the planks to the right size. Build the frame first. Then attach the planks to the front and top.
-
Stain or paint the wood to your liking.
-
Attach casters to the bottom for easy movement.
This project uses recycled materials. It is very satisfying to build something from scratch. Each pallet wood stand is one of a kind.
9. The Simple Bookshelf TV Stand
Do you have a tall bookshelf? You can lay it on its side. This instantly creates a wide and roomy TV stand. It is the easiest project on this list.
Materials You Need:
-
A tall, sturdy bookshelf (like the IKEA KALLAX)
-
Furniture straps (for safety, if you have children)
Simple Steps:
-
Choose a bookshelf that is strong and wide.
-
Empty all the shelves.
-
Carefully lay the bookshelf on its side on the floor.
-
The shelves are now vertical compartments. You can store many items inside.
-
Place your TV on top. It is that simple.
For safety, anchor the bookshelf to the wall. Use furniture straps. This prevents it from tipping over. This idea provides maximum storage with zero building.
10. The Concrete Block and Wood Bench
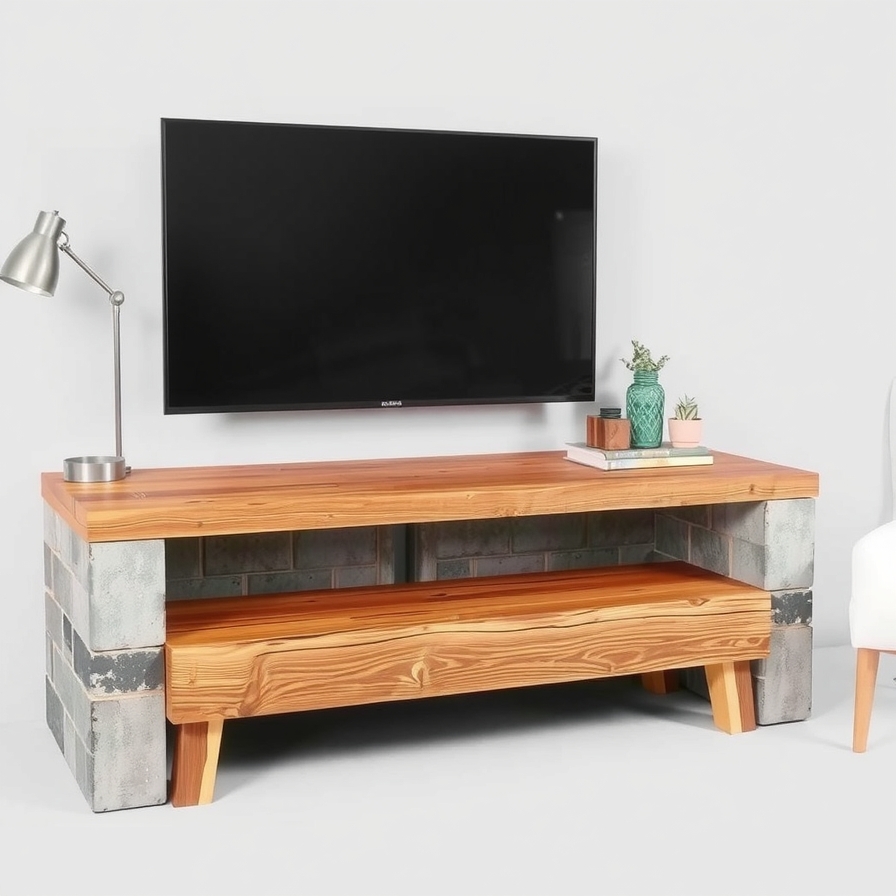
This idea is similar to the cinder block stand. But it uses larger concrete blocks and thick wood. It creates a low, long bench perfect for a large TV.
Materials You Need:
-
Large concrete blocks (4 or 6)
-
A very thick wooden beam or several planks
-
Concrete sealant (optional)
Simple Steps:
-
Place the concrete blocks on the floor. Space them evenly.
-
If you want to prevent dust, paint the blocks with a concrete sealant.
-
Place the thick wooden beam on top of the blocks. Make sure it is centered and secure.
This stand has a solid, grounded feel. The wood and concrete combination is very durable. It can support the heaviest TVs without any problem.
Frequently Asked Questions (FAQs)
How much weight can a DIY TV stand hold?
The weight depends on the materials. Cinder blocks and industrial pipes are very strong. Wood crates and hairpin legs have lower weight limits. Always check the limits of your materials. When in doubt, build stronger than you think you need.
What tools do I need for these projects?
Basic tools are enough for most projects. You will need a saw, a drill, a screwdriver, sandpaper, and a measuring tape. Some projects, like the pipe stand, need a pipe cutter or wrench.
How do I make sure my TV stand is safe?
Safety is the most important thing. Make sure your stand is level on the floor. For tall stands, anchor them to the wall. This stops them from tipping over. Always distribute the weight evenly. Do not put a heavy TV on a weak stand.
Can I paint or stain the wood?
Yes. Painting or staining wood makes it look better. It also protects the wood from spills and scratches. Always sand the wood first. Then apply a primer before painting. For staining, use a cloth or brush to apply an even coat.
Where can I find cheap materials?
Look for materials at thrift stores, garage sales, and online marketplaces. You can often find free pallets or old furniture. Hardware stores sometimes have scrap wood at a discount.
Final Thoughts
Building your own TV stand is a rewarding project. You do not need to be an expert. Start with a simple idea like the cinder block stand or the bookshelf hack. You will gain confidence. Then you can try more complex builds.
Your DIY stand will be unique. It will fit your space and your style perfectly. You will also save a significant amount of money. Most importantly, you will have the pride of creating something with your own hands. So pick an idea, gather your materials, and start building. Your new TV stand awaits.